Map Overview Creation for Gold Source Engine Games & Mods
In this tutorial I will explain how to create your own overview for custom made maps.
The final product will be similar to the retail map’s overviews in Counter-Strike 1.6 and Condition Zero (With some finishing touches, they might be even better…)
Before we begin
The question here is what is overview? Well, that’s the fancy function for Counter-Strike for example that allows the players that are dead or are currently spectating to view a picture of the map, alongside some dots for the currently alive players. I am sure everyone (if they were not hiding in a cave for the past 20+ years have seen this one way or another).
What are we going to need?
Well for starter a map (if you are reading this, most probably you already have your own custom map that you plan to create overview for).
Image editing software capable of indexing the colors for *.bmp files – I will use a program called “PhotoFiltre Studio X” – but you can use what you have available, even the regular MS Paint will do.
Text editor – I will use Notepad++, but the plain old Notepad will also work as long as you don’t mess up with the encoding of the *.txt document, but my presumption is that you know what you’re doing.
Obviously, you will need copy of Half-Life, Counter-Strike 1.6 or Condition Zero … but that’s self-explanatory… For the purpose of this tutorial, I will use Half-Life on Steam. (It might work on non-steam, but I am not going to support it or answer any questions regarding pirated software…). The procedure for WON Half-Life is similar, but a bit different and I am not going to cover it here.
Ok let us start.
You will need to setup your monitor to resolution 1024x768 (yeah, I know… but if you do not then the image generated will not work properly…). I presume how to do that on your Windows 10? No?
Very well then:
Go to Desktop > Right Click > Display Settings > Select the primary display (assuming you have multiple displays) – then you need to scroll down and you will find a drop down menu called “Display resolution” – change it to 1024x768 – there’s going to be a pop up asking for the changes to be kept or not, click on Keep Changes(you will be reverting back to defaults after you’re done taking a picture).
You will also need to setup your Half-Life to use 1024x768 resolution as well. You know how to do that?
Launch your game from Steam, in the main menu select “Options” > Video and mirror those settings.
Important note – the overview cannot be generated in Software mode or 3DX (is this one still on Steam?); so, OpenGL is the way to go…
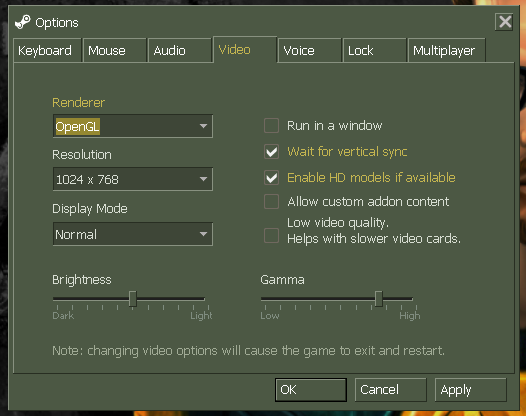
Figure 01: Video Setting (in game)
When you click Apply, the game might restart depends on configuration, nothing to worry about. 😊
Now go and create a server using the map you would like to create overview for. Take a note that you would need to make sure the HUD elements are not showing, and you my advice would be to stay away from any buy zones or any other landmarks in your mod or game that might produce something on the screen.
To hide the HUD (Heads up display) in any Half-Life game or mod you can use the console command:
“hud_draw 0”
Another thing to keep in mind is that obviously you do not want any boots shooting at you while you are adjusting the overview picture…
So, you have hidden your HUD now what? Well, you need to execute the following commands as well:
“sv_cheats 1”
no restart is needed after this one; still I find it odd that in previous builds the next command did not required the cheats to be active in order to work…
The next command is:
“dev_overview 1”
If you have done everything correctly your view will change to something like this:
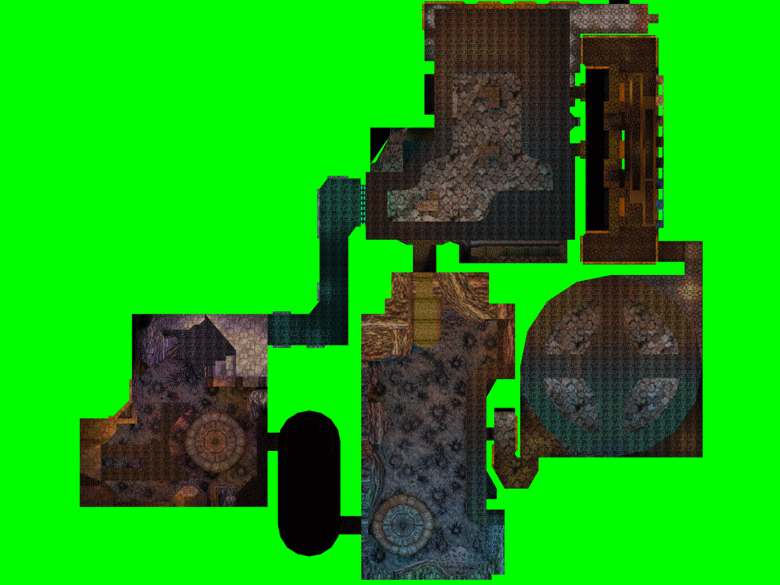 Figure 02: In-game view after typing “dev_overview 1”
Well, what do you know… Now this is sort of what the overview will look like, but there might be some problems. I will list some of them here and how to resolve them:
You I might have issue with seeing the map properly if you have bad lightning (intentionally or unintentionally…) – this can be fixed with a command:
“r_fullbright 1”
This will remove the shadows, make sure to revert afterwards…
If the map is not in correct position you can move around the overview until you get your “Perfect” image. To do that you can use the “W”, “A”, “S” and “D” keys; also the “Up Arrow” and “Down Arrow” keys on your keyboard. The primary (+Mouse1*) and secondary (+Mouse2) mouse buttons will also help. You really need to experiment, but you will know it when it is ready.
Now once that perfect position is ready, there are two things to do.
The first one is to hit your “F5” key, this will same a mapname0000X.bmp, that’s file in your game/mod directory that you will be using for the edit.
Take a note that PrtScr button will not work properly. I would also advise against using the “F12” Steam button for taking the screenshot.
Fun fact about the naming convention of the screenshots: the filename will always end in 4 numbers starting from 0000 to 9999 – do you really need that many screenshots… Having in mind that each will be around 2.25Mb… that is 2.25Gb of space 😊 - so do not take all those screenshots unless you really need them… also if you’re mod developer, make sure to delete them before you create the final package for your mod (lol…)...
The second thing is to check in the console for the exact coordinates of your position at the moment. If you have noticed, when we wrote “dev_overview 1” in the console we started getting spammed with some values. They overflow too fast, and if we move (I explained how to do that above) the values will also change… so make sure not to move when you are taking the screenshot with F5 and when you are getting the values collected.
I find it best when I get to the desired position, to type in the console:
“dev_overview 2”
and the value spam will stop on the last location, thus making it easier to collect the values we need.
Here’s example of what the values for my map are:
Overview: Zoom 1.71, Map Origin (612.00, 720.00, 838.00), Z Min 1793.00, Z Max -235.00, Rotated 0
Note: In the console, mark what you would like to get, right click > Copy.
Obviously, the zoom is how much we zoomed in the dev_overview in order for us to fit the whole map into the screen. The map origin – well this one is self-explanatory. The Z Max is the height of the map (you can see the same in Hammer editor.). The last parameter should ideally be 0, but for some reason you might have rotated the overview image or I don’t know what… (I am yet to se an overview with different value for this parameter).
Now the fun part… We need to do two more things and we are ready. We need to transform the value from the above output into a TXT file that the engine can read, and we need to edit the bmp image we captured.
Let us edit the *.bmp image first.
Go to your mod or game directory. Assuming you have done everything right you should have a file called mapname000X.bmp, if you do not go back to the beginning of the tutorial and do the steps again…
Copy that file to a directory you will be using for your work.
 Figure 03: Locating the bmp file in the game directory.
Now open the file in the image editing tool of your choosing, I will use PhotoFiltre Studio X for this one. You can modify the overview, for example you can paint some additional details: Bomb sites, hostage zones, VIP zones or any other text you would like to have visible on the overview.
I also like to use the overview image for credits section and to put the map name for example.
So, the steps for indexing the colors for the image in PhotoFiltre Studio X are:
Click on the icon named “Indexed color” > select 256 colors (leave the tick mark on “Diffusion” and click “Ok”.
Note you will receive error if you have image with multiple layers. If this is the case just merge the layers before doing that.
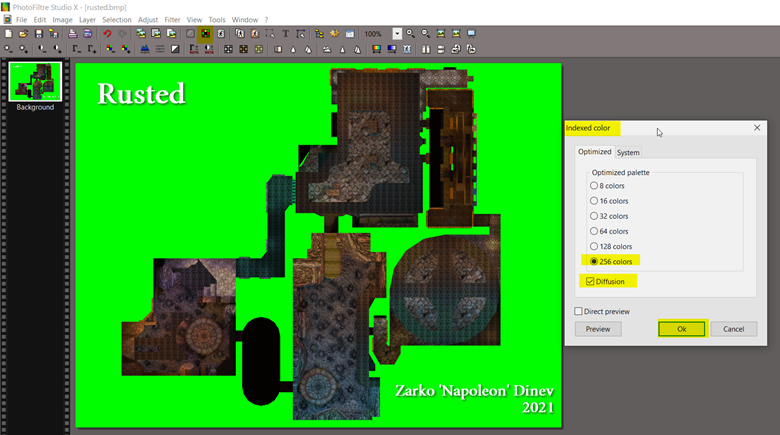 Figure 04: Indexing the overview colors in PhotoFiltre Studio X
Now you can save your image as bmp file. The name for that image should be “mapname.bmp”
If you have done everything correctly the image file should be with size of around 770kb; if the image is bigger you screwed up, and attempt to load that image might crash the game. If this is the case... go back and properly edit your image to have indexed colors.
Fun fact: In the Steam version of Half-Life (Counter-strike 1.6 and Condition Zero) in the “overviews” folder for each map there are 3 files… not just the *.txt and *.bmp file… there is a *.tga version of the overview… I’m not sure what role that *.tga image plays as I don’t think the engine for the overview actually loads *.tga files. In case you would like to be perfectionist you can create a .tga version of your overview as well. Just be warned that if you export the image from PhotoFiltre Studio X it will be flipped heads-down… There is annoying bug with the .tga export in the program and the Devs have not yet fixed it…
Next, we need to create a txt file that will point to our overview bmp image.
Create a folder called “overviews” if you do not have one and place the image file and the empty txt file called the same name as your map inside.
So, assuming the map is called rusted (well that's the name of my map anyway...), in the folder “overviews” you should have the following 2 files: “rusted.bmp” and "rusted.txt”
Now, let us steal some code from one of valve’s overview txt descriptor files. Let us open “crossfire.txt”. I will do that in notepad++ as it is easier and tidier. If you would like to include comments in the txt files use “//”, I like to put some extra details and credits inside.
I will mark the parts that correlate with the output we got from the console in the same colors, and then on the next page I will show you the completed output.
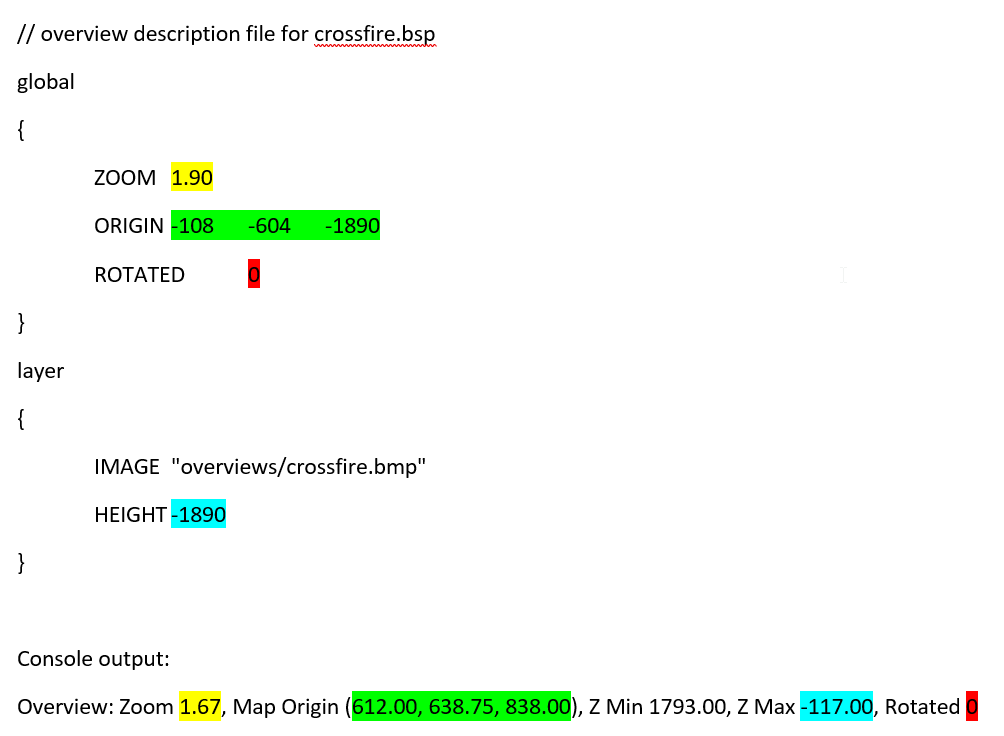 Figure 05: Locating the bmp file in the game directory.
So here’s the finished output for my map’s txt overview file (called “rusted.txt” ):
// overview description file for rusted.bsp

global

{

	ZOOM	1.67

	ORIGIN	612.00 	638.75	838.00

	ROTATED	0

}


layer

{
	IMAGE	"overviews/rusted.bmp"

	HEIGHT	-117.00
}

// Napoleon was here at some undisclosed time (2021).

// end
Take a note that we also included a line for the “image” file parameter that is going to be used for the overview. We are basically pointing to the image file (*.bmp) we created, and we put in the overviews folder. In theory you can use any folder you would like, and you can name your overview image how you would like, for as long as the details are correctly filled in into the txt file… Having said that, I still prefer to stick with the best practices following the model provided by Valve.
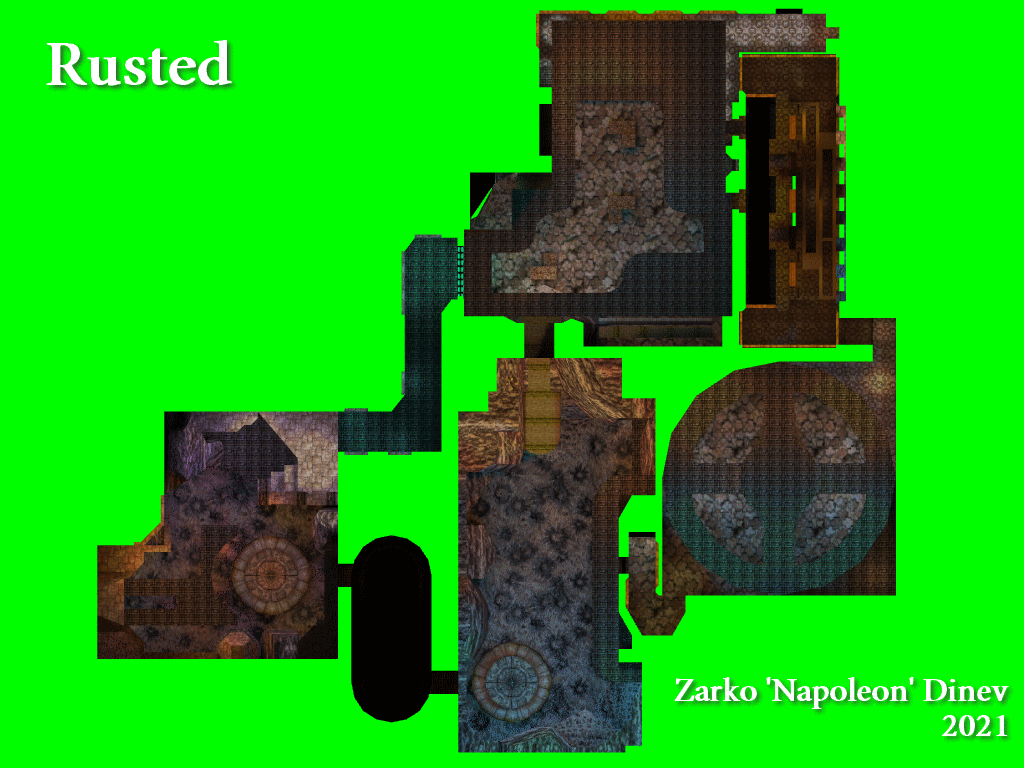 Figure 06: The finished overview image.
Let us try it in-game. Go and load crossfire first; we’re going to use it as example.
In the console write “allow_spectators 1” then “spectate” ; you might have to press [Spacebar] few times.
Ok, apparently just indexing and saving the image will work to create basic overview image, however the image will show its green parts in-game. Take a look of those comparisons, the first one if the overview of crossfire, the second one is our overview.
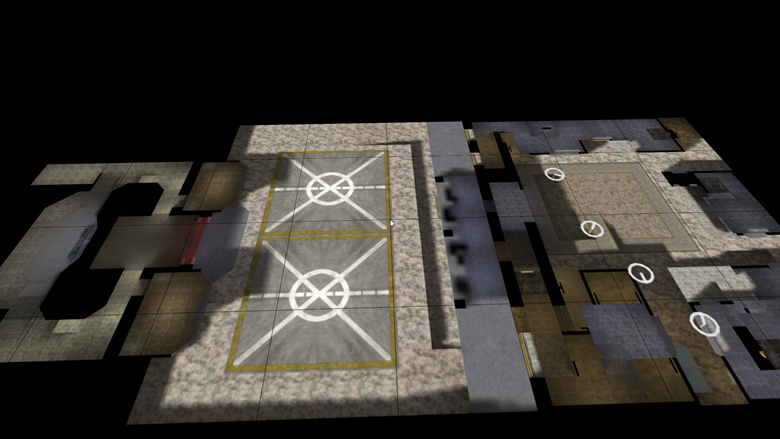 Figure 07: Crossfire (valve map) overview in-game.
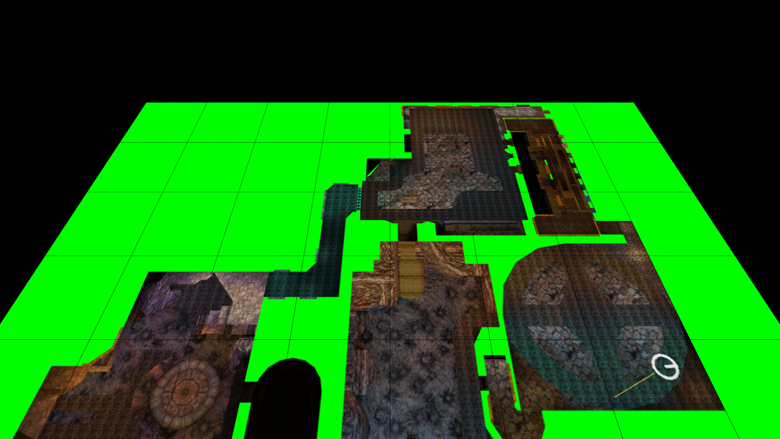 Figure 08: Rusted (our map) overview in-game.
You noticed the difference and you did not like it right… Let us try to fix that. Open the image in PhotoFiltre Studio X and using the bucket tool change the green color to “blue” or “teal”. I have selected a different color since… I will need to edit the color palette in another tool (Wally) and I cannot correctly re-paint green on green…
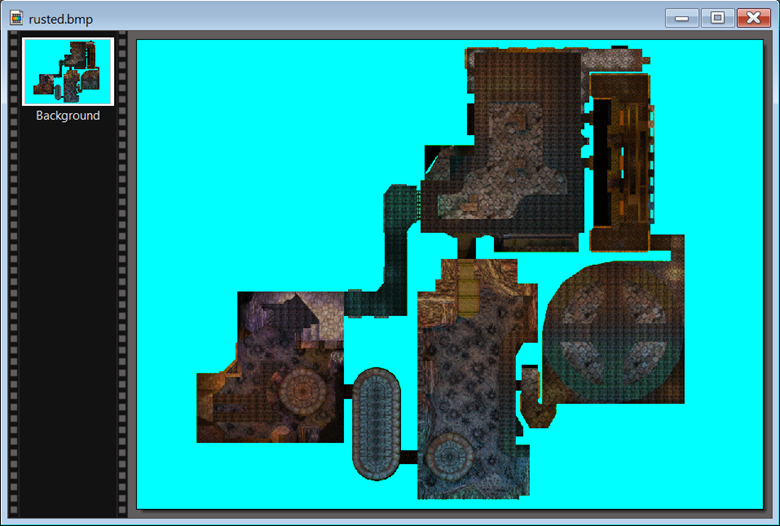 Figure 09: Edited to teal color.
Save the image and let us open the crossfire overview and rusted overview in Wally and let’s compare the color palette.
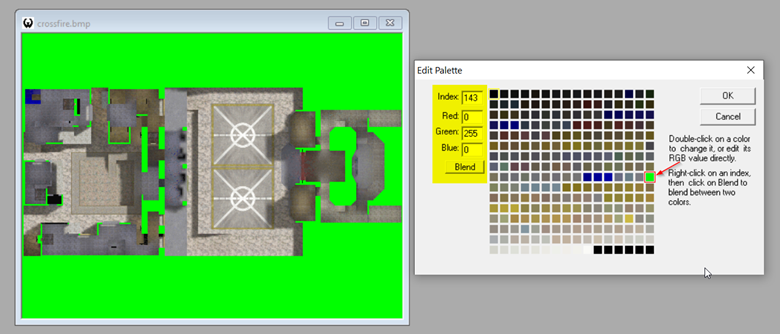 Figure 10: Crossfire overview in Wally.
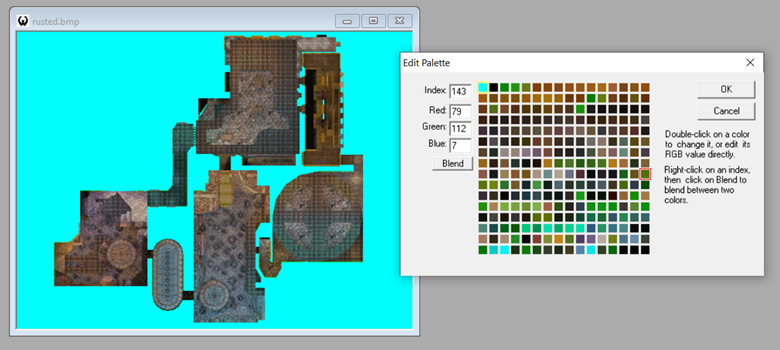 Figure 11: Rusted overview in Wally.
For some reason, the transparency color for the overviews is not the last color in the palette, it’s the 143-rd.
So, we need to change that in our image… In Wally select the Index 143 and make it to look like this:
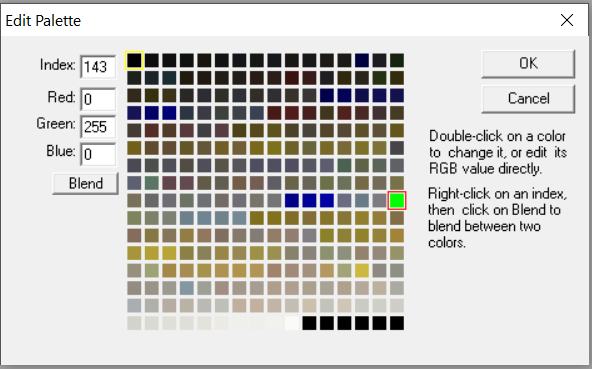 Figure 12: Correct Index: 143 values.
Then use the bucket tool to color the overview image with the correct color.
Tip: Make sure to Save your work frequently, since the huge amount of data exchanged might cause Wally to crash and you will lose your progress… Something like this:
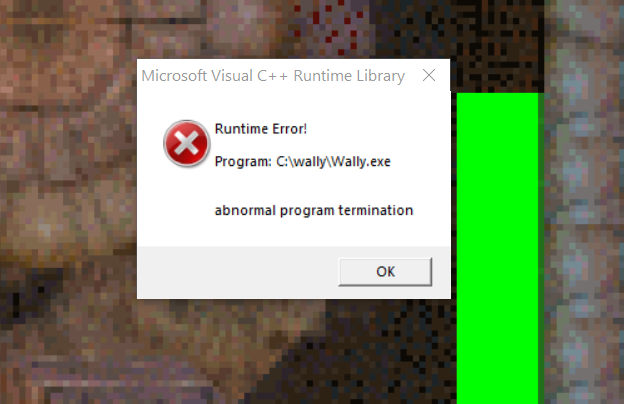 Figure 13: Wally cash…
When you are happy with the image, save it.
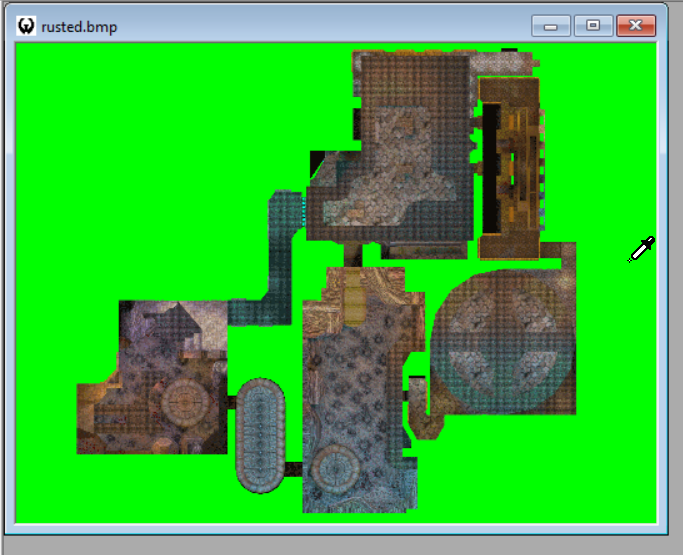 Figure 14: Sort of ready image.
Let us check it in-game. Looks better, right?
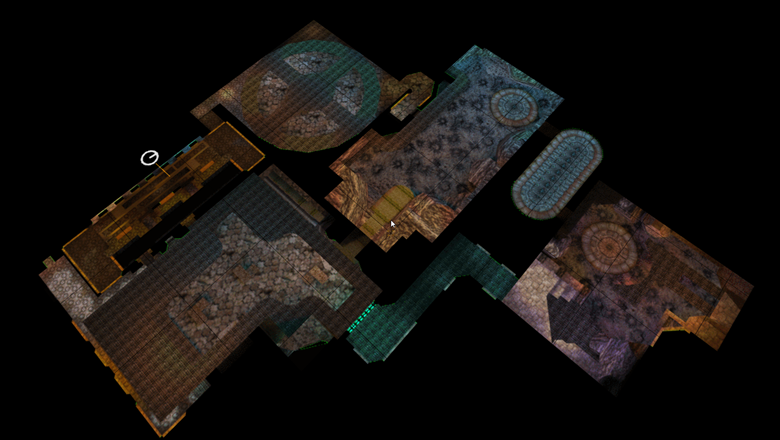 Figure 15: The in-game overview image with working transparency.
Well, there are few more not that good spots here… but I think I can live with it.
Well, believe it or not, this is the end of the tutorial. Go lunch the game and jump into spectator mode (or get killed if you are into that) and enjoy your overview image.
If it does not work… you did something wrong… you have all the time in the world to read trough this tutorial and experiment.
If you are into experiments, you can play around with the *.bmp image and recolor or modify parts of it to fit your liking, the possibilities are endless.
Final words: Well I'm pretty sure that I'm not the one to discover the hot water and this tutorial might not look that original; still the other tutorials that I have found hanging around the internet were somewhat either missing details or full with obsolete information, no longer applicable for Steam released Half-Life and Gold Source games. You have to admit: Who is using WON those days?
About the pirated versions.. I'm not going to talk about, since I do not approve that and will not support it. If you don't have a copy of Half-Life for Steam... now is the time as the Complete Valve pack is just 10 Euro and you get tones of games from there. If you're after Half-Life it's just 1.63 Euros.. the equivalent of a cup of coffee :)
Ah yeah, I almost forgot: You can download the map I used as example here, my brush-by-brush rebuild of a classic Gunman Chronicles map:
Download Rusted Rebuild - Mod DB
If you don’t like something – MOD it!
Napoleon was here at some undisclosed time in 2021…